Simulation of Arduino Calculator 1(อ้างอิง https://circuitdigest.com/microcontroller-projects/arduino-calculator-using-4x4-keypad )
Simulation of Arduino Calculator:
We can also try simulating the project using Proteus software. Proteus does not have an Arduino component on it’s own, but can be easily downloaded and added to its library. Once you have the Arduino component on Proteus, just add Alphanumeric LCD and Keypad to make the connection as shown in the circuit diagram.
Then download the hex file from here and add it to the Arduino by double clicking on board in Proteus and point the “program file” to this downloaded hex file. A snap shot of the simulation is shown below, the complete working is shown in the video below.
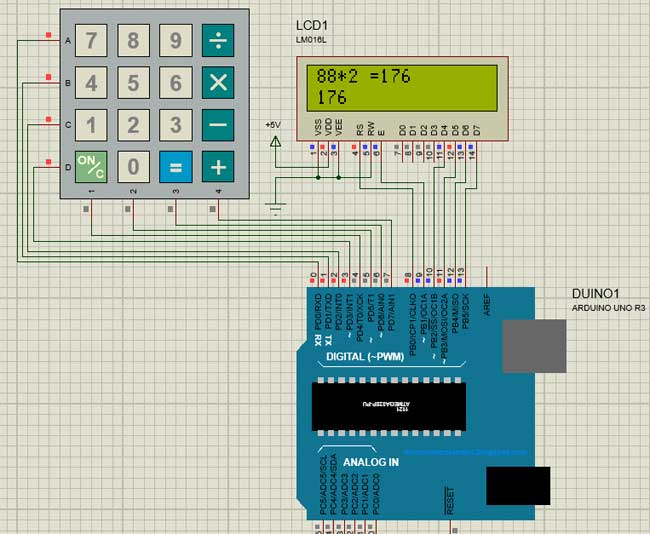
Note: The hex file given is not as same as the original of the program given below. It has been modified to since the keymap of the simulation keypad and the actual hardware keypad is different
Working of Arduino Calculator:
Make the connections as per circuit diagram and upload the code below. If it shows error make sure you have added the library as per the instruction given above. You can also try the simulation to check if the problem is with your hardware. If everything is done as it’s supposed to be, then your hardware will look something like this below with the LCD displaying this
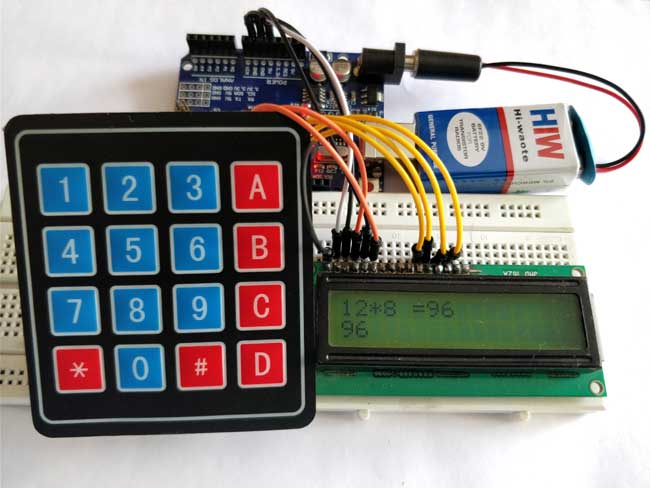 Since the keypad used here does not have proper markings on it I have assumed the Alphabets to be operators as listed below
Character on Keypad
|
Assumed to be
|
“A”
|
Addition (+)
|
“B”
|
Subtraction (-)
|
“C”
|
Multiplication (*)
|
“D”
|
Division (/)
|
“*”
|
Clear (C)
|
“#”
|
Equals (=)
|
You can use a marker to write over what each button actually represents.
With that done, you can directly start using the calculator. Types the number and will appear on the second line press the operand and type your second number finally press the “#” key to get your result. You can also try building this Touchscreen based Arduino calculator.
Code:
/*
* Arduino Keypad calculator Program
*/
* Arduino Keypad calculator Program
*/
#include <LiquidCrystal.h> //Header file for LCD from https://www.arduino.cc/en/Reference/LiquidCrystal
#include <Keypad.h> //Header file for Keypad from https://github.com/Chris--A/Keypad
#include <Keypad.h> //Header file for Keypad from https://github.com/Chris--A/Keypad
const byte ROWS = 4; // Four rows
const byte COLS = 4; // Three columns
const byte COLS = 4; // Three columns
// Define the Keymap
char keys[ROWS][COLS] = {
char keys[ROWS][COLS] = {
{'7','8','9','D'},
{'4','5','6','C'},
{'1','2','3','B'},
{'*','0','#','A'}
};
byte rowPins[ROWS] = { 0, 1, 2, 3 };// Connect keypad ROW0, ROW1, ROW2 and ROW3 to these Arduino pins.
byte colPins[COLS] = { 4, 5, 6, 7 }; // Connect keypad COL0, COL1 and COL2 to these Arduino pins.
byte colPins[COLS] = { 4, 5, 6, 7 }; // Connect keypad COL0, COL1 and COL2 to these Arduino pins.
Keypad kpd = Keypad( makeKeymap(keys), rowPins, colPins, ROWS, COLS ); // Create the Keypad
const int rs = 8, en = 9, d4 = 10, d5 = 11, d6 = 12, d7 = 13; //Pins to which LCD is connected
LiquidCrystal lcd(rs, en, d4, d5, d6, d7);
LiquidCrystal lcd(rs, en, d4, d5, d6, d7);
long Num1,Num2,Number;
char key,action;
boolean result = false;
void setup() {
lcd.begin(16, 2); //We are using a 16*2 LCD display
lcd.print("DIY Calculator"); //Display a intro message
lcd.setCursor(0, 1); // set the cursor to column 0, line 1
lcd.print("-CircuitDigest"); //Display a intro message
char key,action;
boolean result = false;
void setup() {
lcd.begin(16, 2); //We are using a 16*2 LCD display
lcd.print("DIY Calculator"); //Display a intro message
lcd.setCursor(0, 1); // set the cursor to column 0, line 1
lcd.print("-CircuitDigest"); //Display a intro message
delay(2000); //Wait for display to show info
lcd.clear(); //Then clean it
}
lcd.clear(); //Then clean it
}
void loop() {
key = kpd.getKey(); //storing pressed key value in a char
key = kpd.getKey(); //storing pressed key value in a char
if (key!=NO_KEY)
DetectButtons();
DetectButtons();
if (result==true)
CalculateResult();
CalculateResult();
DisplayResult();
}
}
void DetectButtons()
{
lcd.clear(); //Then clean it
if (key=='*') //If cancel Button is pressed
{Serial.println ("Button Cancel"); Number=Num1=Num2=0; result=false;}
if (key == '1') //If Button 1 is pressed
{Serial.println ("Button 1");
if (Number==0)
Number=1;
else
Number = (Number*10) + 1; //Pressed twice
}
if (key == '4') //If Button 4 is pressed
{Serial.println ("Button 4");
if (Number==0)
Number=4;
else
Number = (Number*10) + 4; //Pressed twice
}
if (key == '7') //If Button 7 is pressed
{Serial.println ("Button 7");
if (Number==0)
Number=7;
else
Number = (Number*10) + 7; //Pressed twice
}
if (key == '0')
{Serial.println ("Button 0"); //Button 0 is Pressed
if (Number==0)
Number=0;
else
Number = (Number*10) + 0; //Pressed twice
}
if (key == '2') //Button 2 is Pressed
{Serial.println ("Button 2");
if (Number==0)
Number=2;
else
Number = (Number*10) + 2; //Pressed twice
}
if (key == '5')
{Serial.println ("Button 5");
if (Number==0)
Number=5;
else
Number = (Number*10) + 5; //Pressed twice
}
if (key == '8')
{Serial.println ("Button 8");
if (Number==0)
Number=8;
else
Number = (Number*10) + 8; //Pressed twice
}
if (key == '#')
{Serial.println ("Button Equal");
Num2=Number;
result = true;
}
if (key == '3')
{Serial.println ("Button 3");
if (Number==0)
Number=3;
else
Number = (Number*10) + 3; //Pressed twice
}
if (key == '6')
{Serial.println ("Button 6");
if (Number==0)
Number=6;
else
Number = (Number*10) + 6; //Pressed twice
}
if (key == '9')
{Serial.println ("Button 9");
if (Number==0)
Number=9;
else
Number = (Number*10) + 9; //Pressed twice
}
if (key == 'A' || key == 'B' || key == 'C' || key == 'D') //Detecting Buttons on Column 4
{
Num1 = Number;
Number =0;
if (key == 'A')
{Serial.println ("Addition"); action = '+';}
if (key == 'B')
{Serial.println ("Subtraction"); action = '-'; }
if (key == 'C')
{Serial.println ("Multiplication"); action = '*';}
if (key == 'D')
{Serial.println ("Devesion"); action = '/';}
{
Num1 = Number;
Number =0;
if (key == 'A')
{Serial.println ("Addition"); action = '+';}
if (key == 'B')
{Serial.println ("Subtraction"); action = '-'; }
if (key == 'C')
{Serial.println ("Multiplication"); action = '*';}
if (key == 'D')
{Serial.println ("Devesion"); action = '/';}
delay(100);
}
}
}
}
void CalculateResult()
{
if (action=='+')
Number = Num1+Num2;
{
if (action=='+')
Number = Num1+Num2;
if (action=='-')
Number = Num1-Num2;
Number = Num1-Num2;
if (action=='*')
Number = Num1*Num2;
Number = Num1*Num2;
if (action=='/')
Number = Num1/Num2;
}
Number = Num1/Num2;
}
void DisplayResult()
{
lcd.setCursor(0, 0); // set the cursor to column 0, line 1
lcd.print(Num1); lcd.print(action); lcd.print(Num2);
if (result==true)
{lcd.print(" ="); lcd.print(Number);} //Display the result
lcd.setCursor(0, 1); // set the cursor to column 0, line 1
lcd.print(Number); //Display the result
}
{
lcd.setCursor(0, 0); // set the cursor to column 0, line 1
lcd.print(Num1); lcd.print(action); lcd.print(Num2);
if (result==true)
{lcd.print(" ="); lcd.print(Number);} //Display the result
lcd.setCursor(0, 1); // set the cursor to column 0, line 1
lcd.print(Number); //Display the result
}


ความคิดเห็น
แสดงความคิดเห็น